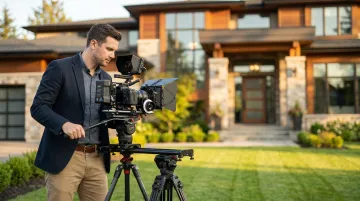
Introduction
Are your listing photos actually showing buyers what they need to see? The sprawling backyard, the waterfront access, how the neighborhood connects to nearby parks and schools — or are static ground-level shots leaving all of that context on the table?
The reality is most buyers start their property search online. According to NAR's 2025 Generational Trends Report, 51% of buyers found the home they purchased on the internet. That means your listing visuals compete before a single showing is booked.
Drone videography has become a real differentiator. NAR's 2025 REALTOR Technology Survey found 52% of REALTORS now use drone photography or video — making it a mainstream tool, not a luxury add-on.
What follows is a practical guide to using drone video well — from pre-shoot planning and must-capture angles to FAA compliance and when it makes sense to bring in a pro.
Key Takeaways
- Aerial video shows buyers lot size, surrounding context, and property scale in ways ground-level photos can't match.
- FAA Part 107 certification is legally required for any commercial drone work in the U.S., including real estate marketing.
- Effective drone video starts with pre-shoot planning: a clear shot list, dialed-in camera settings, and a planned shoot window.
- For high-value or complex properties, an FAA-licensed video production professional will outperform a DIY approach.
Why Drone Videography Changes the Listing Game
What Ground-Level Photos Can't Show
A front-facing exterior photo tells buyers one thing: what the front of the house looks like. Drone video tells a story. In a single continuous shot, aerial footage can communicate:
- Lot size and property boundaries
- Landscaping flow and outdoor living spaces
- Proximity to amenities — parks, waterfronts, schools, the downtown skyline
- How the neighborhood streetscape connects to the property
This matters enormously for out-of-town and relocating buyers who cannot visit in person. They're making major decisions based on what they see on a screen, and aerial footage answers questions that no interior shot can.
Video vs. Photography: The Emotional Difference
Drone photography captures a moment. Drone video pulls viewers into the experience — and that distinction drives real results.
A slow orbit around a waterfront property, a pull-back reveal rising above a tree canopy, a glide over a pool and patio at golden hour: these create the feeling of being there. That emotional engagement is what turns a click into a showing request. Media Furrate's approach to drone work reflects this — every aerial shoot starts with a conversation about the property's story and what the footage needs to communicate.
What the Data Shows
That emotional pull translates directly into listings. NAR Magazine's research found 73% of homeowners are more likely to list with an agent who uses video — while only 10% of agents were actually using it at the time of that report. For agents willing to invest in aerial footage, that's a meaningful competitive edge.
Drone video is particularly effective for properties where exterior features are a primary selling point:
- Pools and covered outdoor living areas
- Large acreage or irregular lot shapes
- Waterfront or golf course access
- Distinctive architectural rooflines
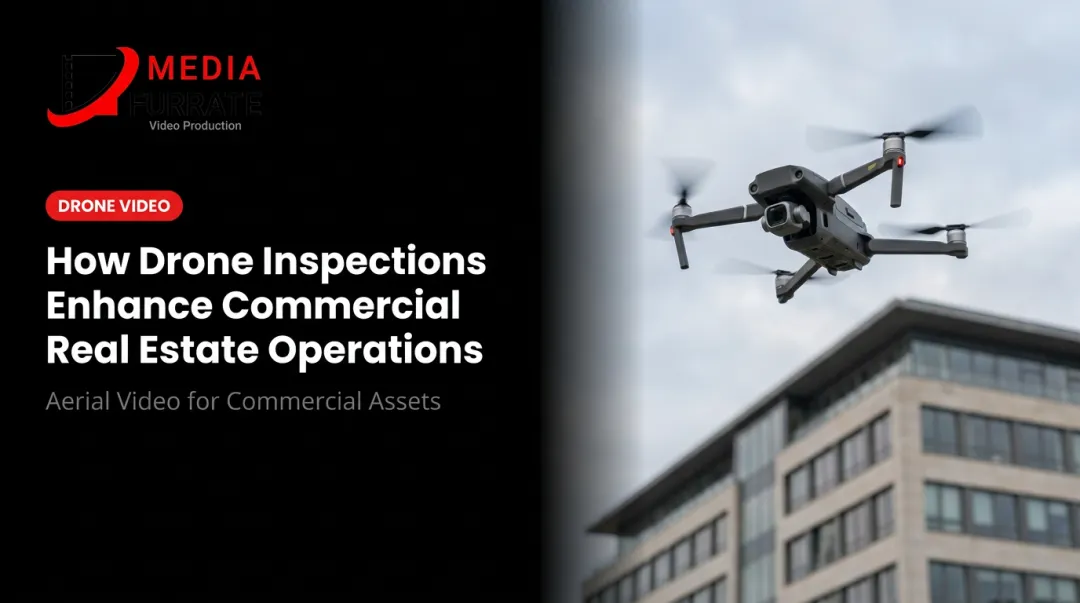
- Commercial real estate and mixed-use developments
FAA Regulations: What You Must Know Before Flying
Part 107 Is Not Optional
Any drone use for commercial purposes in the U.S. requires an FAA Part 107 Remote Pilot Certificate. The FAA is explicit: "taking photos to help sell a property or service" qualifies as non-recreational use — even if the pilot isn't separately paid for the flight.
To obtain Part 107 certification, a pilot must:
- Be at least 16 years old and able to communicate in English
- Pass the Unmanned Aircraft General – Small (UAG) knowledge exam at an FAA-approved testing center
- Complete recurrent online training every 24 calendar months to keep the certificate current
- Register the drone with the FAA ($5, valid for 3 years)
Operational Rules That Affect Every Shoot
Part 107 sets hard limits on every commercial flight:
- Maximum altitude of 400 feet AGL (above ground level)
- Maximum groundspeed of 100 mph
- Visual line of sight with the aircraft at all times
- No flight in controlled airspace without authorization
For airspace checks, the FAA's B4UFLY app provides situational awareness around airports, restricted zones, and temporary flight restrictions. For controlled airspace authorization, LAANC (Low Altitude Authorization and Notification Capability) provides automated clearance at or below 400 feet where available.
Properties near Baton Rouge, New Orleans, or any regional airport require an airspace check before every shoot.
Why This Matters for Real Estate Agents
Working with a properly licensed, insured drone operator protects both the agent and the property owner from liability. Before hiring anyone, verify their Part 107 certificate and ask for proof of drone insurance.
A qualified operator — like Media Furrate, which flies with an FAA-licensed pilot — will also handle required airspace waivers when a property sits in restricted or controlled airspace, so the shoot stays legal from start to finish.
How to Plan a Real Estate Drone Video Shoot
Pre-Shoot Reconnaissance
Walk the property before you fly. Use satellite mapping tools like Google Earth to study the layout, identify power lines or tall trees that could limit flight paths, and note which angles best capture the property's standout features. An in-person scout also lets you plan where to position the drone for the most effective approach.
Timing and Light
Golden hour — shoot 25-30 minutes before sunset or shortly after sunrise — produces the warmest, most directional light for exterior footage. Soft shadows, rich color, and a flattering glow on architectural surfaces make a meaningful difference in the final video.
Overcast days work well too. Diffused cloud cover eliminates harsh shadows and creates even exposure across the property. Avoid these conditions entirely:
- High winds — the DJI Mavic 3 Pro's limit is 12 m/s
- Rain or fog — risks equipment and degrades image quality
- Midday sun — creates blown-out highlights and flat contrast
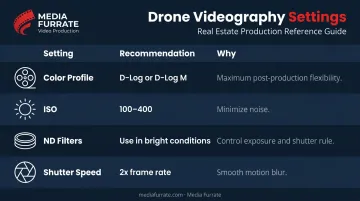
Camera Settings That Matter
| Setting | Recommendation | Why |
|---|---|---|
| Color profile | D-Log or D-Log M | Maximum post-production flexibility |
| ISO | 100–400 (normal video) | Minimize noise in bright conditions |
| ND filters | Use in bright conditions | Control exposure; maintain 180° shutter rule |
| Shutter speed | 2x your frame rate | Smooth, natural motion blur |
Define Your Shot List First
Improvising wastes battery life and misses key features. Before lifting off, list exactly which shots you need in priority order. If you're flying with a standard 20-27 minute battery, you have less time than you think — especially if you're shooting multiple angles at each position.
Brief the property owner before the shoot as well. Small prep steps protect the footage:
- Move vehicles out of the driveway
- Remove pool covers and outdoor clutter
- Clear patio furniture or equipment from featured areas
These details are impossible to fix in post when shooting 4K.
Must-Have Shots for Every Drone Listing Video
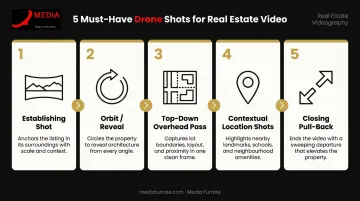
Every real estate drone video should include these five shots, in roughly this sequence:
1. The Establishing Shot A wide, high-altitude approach from a distance. This shot immediately communicates scale, neighborhood context, and the property's relationship to its surroundings. It sets the emotional tone for everything that follows.
2. The Orbit/Reveal A slow circular pass around the property at mid-altitude. This highlights every exterior angle, architectural detail, and the connection between the house and its grounds. Vary the orbit speed and altitude: lower and slower reads as intimate, higher and faster emphasizes scale.
3. Top-Down and Overhead Pass A vertical bird's-eye view reveals lot size, pool layout, patio configuration, and landscaping in a way no ground-level angle can. Pair it with a horizontal overhead pass for full property footprint coverage — especially valuable for large lots, waterfront access, or notable hardscaping.
4. Contextual Location Shots Show the property's surroundings — waterfront access, a nearby golf course, the neighborhood streetscape, proximity to a park or downtown. For relocating buyers who can't visit in person, this footage answers the question "what's it like to live here?" in a way no written description can replicate.
5. The Closing Pull-Back Start close to the home and slowly rise while pulling back to reveal the full property and landscape. It's the strongest closing image in any listing video: the property shrinking into its surroundings as the buyer's sense of place expands.
DIY vs. Hiring a Professional Drone Videographer
The Real Cost of Going DIY
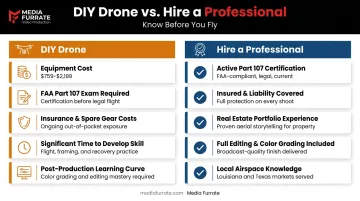
The equipment alone covers a wide range. DJI's current lineup runs from $759 for the Mini 4 Pro to $2,199 for the Mavic 3 Pro. That's before factoring in:
- FAA Part 107 exam preparation and testing fees
- Drone insurance (required for commercial work)
- Spare batteries, ND filter sets, and memory cards
- Time investment to develop actual piloting and cinematic skill
- Post-production editing software and the time to learn it
Professional real estate drone packages from services like HomeJab typically run $249–$499 for drone photos plus video — often less than the hidden costs of a DIY setup when time and compliance are factored in.
When Professional Beats DIY
Some listings can get by with basic aerial coverage. Others can't afford anything less than excellent.
Hire a professional for:
- Luxury homes and high-value listings where first impressions justify premium pricing
- Large estates, waterfront properties, and golf course frontage
- Commercial real estate and mixed-use developments
- Any property where exterior features are the primary value driver
DIY may be sufficient for:
- Standard residential listings where aerial context matters but cinematic quality is less critical
- Agents who are committed to investing in proper training, certification, and equipment over time
What to Look for When Vetting a Professional
Don't hire a drone operator who only flies. Look for someone who understands video production, not just FAA regulations.
A qualified professional brings:
- Active FAA Part 107 certification (ask to verify)
- Proof of drone insurance and liability coverage
- A portfolio of real estate-specific work — not just landscape or event footage
- Full post-production capability: editing, color grading, music, motion graphics
- Local airspace knowledge (especially relevant near airports in markets like New Orleans or Baton Rouge)
Those criteria matter more than most clients realize — and they're worth asking about directly before booking anyone. Media Furrate checks each of these boxes. Based in Baton Rouge and serving the broader Southeastern U.S., the team pairs an FAA-licensed pilot with over 45 years of video production experience spanning more than 10,000 productions.
What that means practically: drone footage is planned as part of a larger visual narrative, with each aerial shot selected to communicate something specific about the property — its scale, surroundings, or standout features. The result is edited, color-graded footage that's ready to publish, not raw clips that still need hours of work before they're usable.
Frequently Asked Questions
How much do realtors pay for drone footage?
Professional real estate drone video packages typically range from $249 to $499 for combined drone photos and video, according to HomeJab's 2025 pricing guide. Pricing varies based on property complexity, region, and whether you're hiring a standalone drone operator or a full-service video production company.
Do I need a license to fly a drone for real estate photography?
Yes, without exception. Any drone use for commercial purposes — including real estate marketing — requires an FAA Part 107 Remote Pilot Certificate. This covers any drone work done in exchange for payment or to promote a property, and certification requires passing the FAA Part 107 knowledge test at an approved testing center.
What is the best time of day to shoot real estate drone video?
Golden hour — the 25-30 minutes before sunset or after sunrise — produces the most flattering light for exterior footage: warm tones, soft shadows, and natural depth. Overcast days are a solid alternative, offering evenly diffused light without harsh highlights or shadows.
What types of properties benefit most from drone videography?
Luxury homes, large estates, waterfront properties, and golf course listings benefit most. Any property with notable exterior features — pools, acreage, scenic surroundings, distinctive architecture — gains significantly from the aerial perspective.
How long does a real estate drone video shoot typically take?
Most residential drone shoots require approximately one hour of flight time, according to UAVCoach. Total on-site time runs longer when you account for pre-flight setup, airspace confirmation, and multiple battery cycles. Properties with complex features or extensive grounds typically require more time.
Can drone footage be combined with interior video tours for a listing?
Yes — and the combination is highly effective. Drone footage handles the exterior story (scale, setting, surroundings), while an interior walkthrough covers layout, finishes, and feel. Together, they give remote buyers the most complete picture possible before committing to an in-person visit.